Welcome!

I am glad you chose to visit! My blog is a compilation of the many hats I find myself wearing. On any given day I may be an encourager, an instructor, or just a lady who is venting. You, dear reader, will probably identify with my triumphs and my tribulations! These snapshots fit into my Life Scrapbook I have named A. McInnis Artworks. I hope you will find something worth your while.


Friday, February 4, 2011

Madame Alexander Birthday


Last year for my granddaughter's tenth year Family birthday dinner, we used a Madame Alexander doll theme. It was close to Easter, so bunnies played a small part in the scheme. I used my very vintage china, milk glass glasses and all the 8inch dolls made "the cut" except for Little Red Ridinghood...she just wasn't dressed in the right colors..sorry LRRH.


Four vintage napkins were the foundation for the centerpiece. Angel hair Easter grass filled in where needed. That's the prettiest stuff made! I have all different colors!


Happy Birthday doll was at the top of our list of invitees. Look at the tiny package! So sweet!

Naturally, our first doll acquisition, Tinkerbell, was invited. She's been around a very long time! She helped by waving her wand and wiggling her nose to get everything placed just right!!

Dorothy's ruby red slippers and the fact that she wanted to bring a dog almost kept her from being invited, but since we needed four dolls to balance the centerpiece, I relented and let her attend.

Last, but certainly not least, Gift From Grandma, attended. The tiny crocheted vest and sateen checked dress were too much for old grandma to resist!

I have a sneaky feeling that the eleventh birthday will have to be a little more "contemporary" so I'm enjoying this while I can...hot pink has rocked her world...uh, oh.


I felt a special card should recognize a decade of existence, so a little mixed media canvas was in order. This was tons of fun to do and has endless possibilities! Try one!!


My cupcake "wrapper" was corrugated cardboard, cupcake itself was smushed tissue paper that had once again been ModPodged to death, background was tissue paper, lots of acrylic paint and a black and white photograph of Gracie completed the card!

We hope you enjoyed our tablescape ideas for a special girl!! All I can say, is they grow up VERY quickly...better use "cute" stuff while you can!

I am linking to Between Naps on the Porch (Tablescape Thursday)...see button on the right..

Blessing and joy to each of you,

Thursday, February 3, 2011

Mixed Media Primer or How NOT To Be Cookie Cutter

I've been asked about my references to MIXED MEDIA art and what it actually means. Mixed media is an art form that combines different mediums like acrylic paint, paper, inks, and maybe even "found" objects. It is a free form style that can be as different as the people who engage in its production. (That's MY definition anyway.)

The picture above, which I call "Tree of Life", is simply acrylic paint on canvas. I would not consider it to be Mixed Media. I used only acrylic and a canvas.


This painting, "Haven't Zinnia You In Awhile", is an example of Mixed Media and involves the following media: photography (blue vase with shadows and paint added); paper (cardstock added to give dimension to the pink, yellow and orange zinnias. I hand cut each petal then painted); white queen anne's lace flowers are hand painted with acrylic paint; background (a variety of papers and stamped designs); butterfly (paper...simply cut out and painted); distressing ink for overall glaze and Mod Podge to seal.


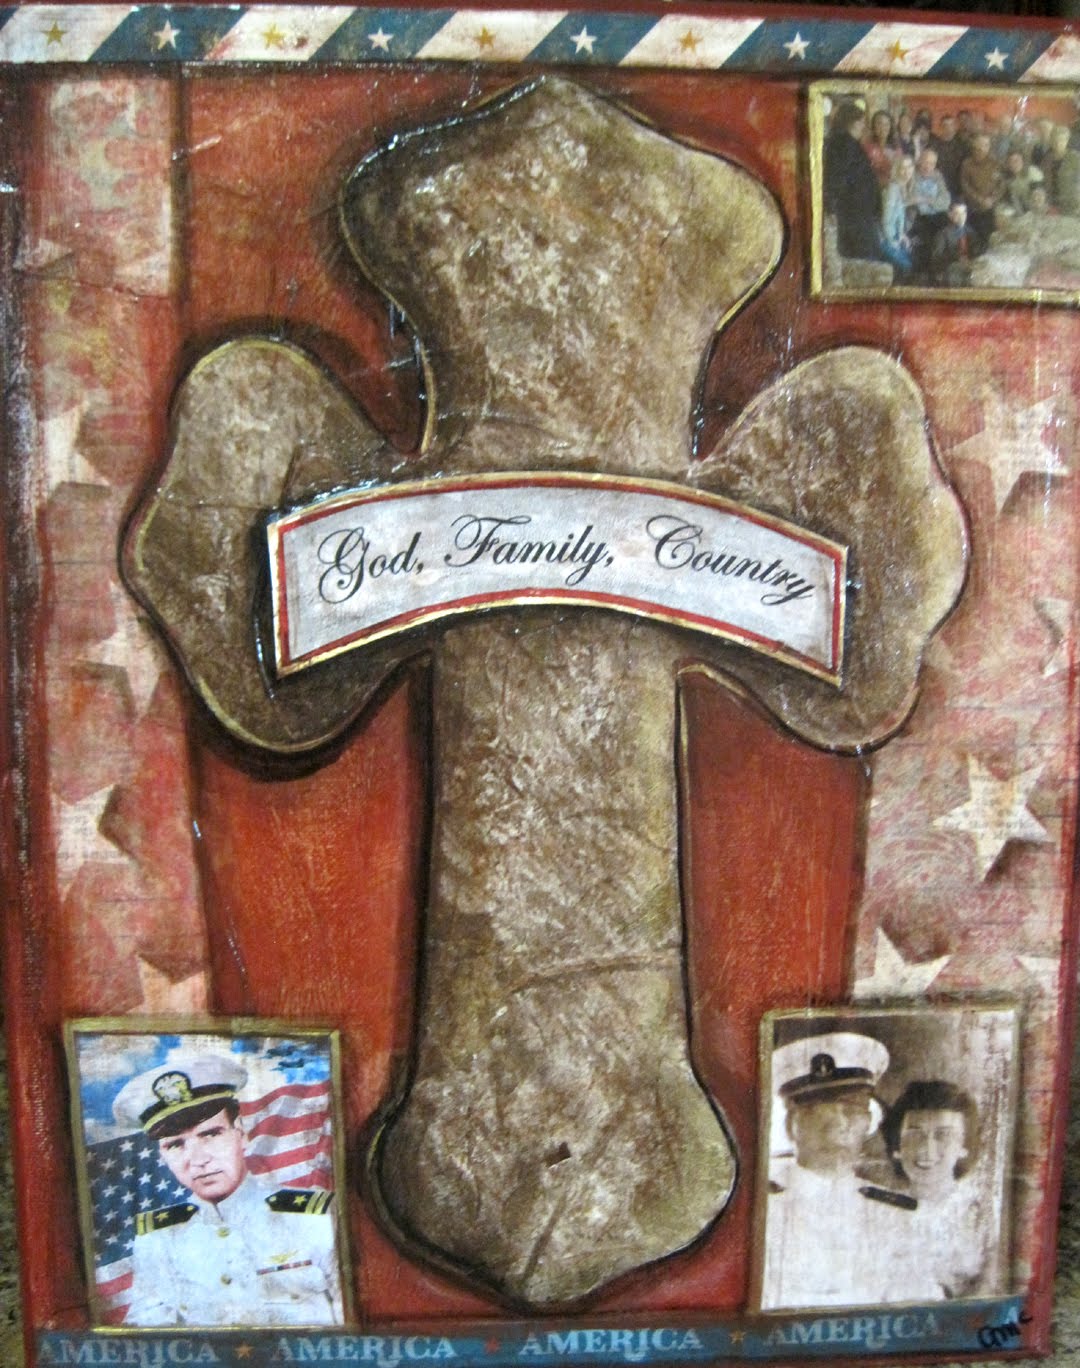
I painted the cross above for my Father in honor of his service in the Navy and presented it to him on Veteran's Day. Again the media used: Cross is painted and shadowed after cutting it out of paper; pictures are copies that were ModPodged onto the canvas; background consists of a variety of papers. This was not difficult and worked up in about 4 hours.


"The Future Looks Bright" is a 7x7" canvas and actually took longer to complete than the cross.
The sunflower consists of a center that is "shrunched up" tissue paper that has been ModPodged to death and then painted. The leaves are paper that has been painted. I used a base of tissue paper for texture and painted the blue and green with acrylic paint. The butterfly, I cut out and painted in the color orange. The time consuming part of this was the petal detail. Each was cut out of yellow cardstock and adhered to the flower. Then I painted and shaded the entire set of petals.


The men in the family don't care for "Remembrance", however, I love her and the canvas is hanging in my computer room...can't please everybody all the time...ha. She consists of a number of items: old dress patterns, scrap book papers that have been painted in the background, acrylics and copper wire. 16x20"canvas.


Below is a picture I did for my October Blog Giveaway. I used tissue, scrapbook papers and lots of paint and distressing ink. About 4 1/2 hours was used in this design.


This is my rendition of a Pottery Barn piece that I loved but could NOT afford...$339! It's fairly large...24x24...but all I used was acrylic paint, paper and distressing ink...love it and it cost me $5!

Up close and personal with "Life's Little Pleasures". One of my first and favorite pieces. Again I used tissue as a foundation for texture. I began making the flowers with scrapbook paper but decided against it and painted over them with acrylics. Newspaper leaves add a little of the unexpected. Brown dots are pieces of bubble wrap I used as a stamp.

This art is very forgiving. The more you practice, the more techniques you develop of your very own. I have found very few really good books on Mixed Media. Most are a little "over the top" for me. I am more of a traditionalist...but a wacky traditionalist. (Anyone who knows me well, will agree, I'm afraid.) I use to try to be mainstream...but my husband summed it up one day when he said, "You see life through 'different' eyes." I didn't think he meant it as a compliment then and I still don't, however, I quit trying to make my art something it wasn't and just let it express ME! Being different is not always easy, but it's a lot more fun than being a cookie cutter type person. Cookie cutter=Booooring!

Join me at Catch a Glimpse Thursday, Transformation Thursdays with the Shabby Chic Cottage and Shabby Nest's Frugal Fridays (see buttons on right!)

Blessings and peace,

Wednesday, February 2, 2011

Revolving Decor Glass and Iron Tray

I admit it...when it comes to decorating I am rather fickle. Something I LOVE today...tomorrow? Maybe not so much. One way I soothe the savage decorating beast is to change vignettes within certain areas of my house. Some places stay the same all the time...I am completely happy with the arrangement...but there are some places that beg for a new dress.

It all began innocently enough. I went to a Southern Living At Home party and fell in love with this glass bottomed tray. Pretty but pricey. I passed, but I never forgot her. Then while browsing in Paul Michael's in Monroe, La., I spied her cousin...oval instead of round, but my heart did a doubletake. I couldn't get her into my buggy fast enough.

She moved right in and felt right at home on the end of my eating area bar. The quest began. What to dress her with...hmmm, something permanent or could this be the "county seat" of evolving seasonal decor?

With fall came colored leaves, bittersweet, abandoned bird's nest and candle. October brought added small pumpkins and November made way for an antique turkey collection with a cornhusk Pilgrim girl.

Gingerbread was my kitchen's theme and the little tray did her part to hold up under the intensity of the season.

Snowbabies, balsam fir candle and a vintage New Year's postcard welcome 2011 in style!
And along comes February, the month of Love!

I found the little tree, naked, at $ Tree. I spied the silk branch of flowers there also. 1+1=2 and there you have the crown of thorns clad Valentine's tree. The " Made in Japan" figure of the girl bearing a cake is one from my collection of figurines and the light pink doily was made by my mother in law. The love card is from a friend.


At the other end of the bar is another small Valentine's display. Another "Made in Japan" figurine makes her way into the mix and the bowl holding holiday cards is from my Secret Pal at school....loooove it!!!

I've used the tray as a base for a pewter bowl filled with lemons, as the home for a topiary, as a holder of mercury glass votive holders and a place of rest for seasonal napkins. It could be used as a serving device...now, that's a novel idea!!

Point of all this? Start with one versatile item and see how many ways you can re-purpose it!
Visit Fireflies and Jellybeans Link Party...see button on the right!

Blessings and love to you,

Tuesday, February 1, 2011

Floppy Flower Container for Baby

Gifts for new babies abound. They are everywhere and are cuter than I ever remember, so when I say I must run pick up a few supplies to make baby gifts for three new arrivals, my husband used to question, "Why don't you just buy something already done? Why do you have to make something?" Good question. Why, indeed? Answer? Because I LIKE making things for people. When I am making something for someone, I am thinking about them the whole time I am crafting...it's just a special action taken for someone in particular. Now, that's out of the way...let's look at the little Cotton Ball and QTip Holders.


I found these simple containers at Big Lots. They were stackable before I put icing on the cake by adding the floppy satin flowers.


I made them using Jones Design Company's directions. Go here for complete tutorial http://jonesdesigncompany.com/. I bought 1/2 yard each of polyester Satin pink and ivory. I cut three size squares (roughly): 3", 2" and 1 1/2".

Using scissors, I rounded off the edges of each square. In her flower, Jones Design Co., used three layers...I used 6 (ever the "over the topper). Then, using tongs, I held each square over a lighted candle until the edges melted and curled. Hold shiny side facing you and be careful. If the fabric burns, catches on fire, or melts too much, let it cool a bit and cut it off and begin again. This only happened once to me. I wouldn't do this with children watching...they might get ideas...

Your petals should look like the picture below after stacking them in place.

I stitched the layers together using a needle and heavy thread and while stitching added little seed pearls in the center. You can make these flowers as large with as many layers as you want. I wanted them slightly floppy for the topper, but not so big that they got in the way of opening the container. I wanted them pretty but practical. Centers could be old jewelry or anything you'd like.


Before adhering the flower to the top with hot glue, I added three small green felt leaves. Then I added a bow made of 4 or 5 different ribbon of varying widths and colors around the neck of the container. I had tiny cards that I tied on and put a sparkly initial and tiny bow for each baby.


Now the containers are filled with cotton balls and Qtips and ready to be used for the everyday tasks of keeping baby clean! When "baby" days are over, the ribbons can be removed and used other ways and the container will still have a floppy flower on top!


I hope the moms enjoy using these gifts as much as I enjoyed making them for their new little cherubs! Wonder what a whole pillow made like this would look like? Hmmm....I see another trip to Hancock's in my future. See more Floppy Flower items here.

I am linking to Dittle Daddle's (Amaze Me Monday) and Boogieboard Cottages (Masterpiece Monday) party...join us by clicking on their button on the right. These are great blogs, check them out!

Blessings and peace to you today,