Welcome!

I am glad you chose to visit! My blog is a compilation of the many hats I find myself wearing. On any given day I may be an encourager, an instructor, or just a lady who is venting. You, dear reader, will probably identify with my triumphs and my tribulations! These snapshots fit into my Life Scrapbook I have named A. McInnis Artworks. I hope you will find something worth your while.


Sunday, January 20, 2013

Humpty Dumpty and Mod Podge to the Rescue!

 If you've read this blog very long, you know that I LOVE taking something "ugly duckling-ish" and turning it into a swan. Well, I have completed two such transformations this week.
One was a big old ugly "plastic" mirror ... now all white and prettily distressed;
  
and this little ceramic "Made In Japan" spice drawer set.
All three drawers were smashed to pieces and the little box had surely seen better days.

This is what the inside of each drawer looked like before transformation.
Now somebody tried to glue Humpty Dumpty back together again...but
it just wasn't getting it.

 My brain begin to whirl...what could I do to the drawers? Replace, make new ones?
 How about repairing the old ones with our old friend, Mod Podge?
Mod Podge to the Rescue!!
First, I covered the drawers on the front outside with several layers of
tissue paper and MP. Then I repeated the process on the inside.
This is the middle drawer that lost its knob.
Picture of the three drawers with the beginning layers of tissue paper.
After securing the tissue with layers of  MP, I set them aside and let them dry.
Next, I painted the beat up little box, blue...then black and distressed it.
I added Annie Sloan dark wax and buffed the black to a soft sheen.

I painted the insides of the boxes, blue and orange and MP'd again.
Then I painted the fronts of the drawers off white, clear waxed them and then dark waxed with AS wax.
I buffed them and after a while decided to paint a similar design to the original ones on the fronts.
I distressed them and added a flower where the knob should have been on the knobless drawer.


This is the result of the rescue.
BTW: Note that one leg is different from the rest.
(This little chest has been through it!)
I lightly sprayed a polyurethane finish both inside and out.
I have no idea how this will hold up, but it appears to be a good fix
for something that was headed to the garbage can!!

Transforming is good,

Tuesday, January 15, 2013

* The Soap Saga

Disclaimer: I must admit that I am the one in the family that has weak knees. I become a little disconcerted by things that don't bother others. For instance, I never embraced the practice of changing babies' diapers; I don't like heights or swimming; and I have several other peculiarities, among them, animals scare me. Now, don't get me wrong I am not mean. I love butterflies and even bunnies, but cats that scratch and dogs that jump up and occasionally snarl, pretty much do me in. I cannot watch a Geico commercial. I check the motel beds for bedbugs...I like my bed clean, the sheets neatly tucked in and nothing but me and the hubster in there.

 All that being said, let me continue with my post. Since my two knee surgeries this summer, I have had terrible leg and foot cramps. They wake me in the night, they hit while I am driving, they are a big nuisance. So my ears perked up when my daddy suggested the "soap" cure. This cure was introduced to him by his friend, Miss Marianne. Since she is full of good practical knowledge, I decided to try it. The "cure" consists of putting a bar of either Ivory or Dial in between your sheets. That's it (for some). Cramps should be a thing of the past...

Last night as I was lying in bed reading my new Romantic Homes magazine, I felt it coming....a cramp in my left foot. It was excruciating...that did it...when you can't even read a magazine in peace, something has to give. I grabbed my cane and limped to the bathroom and opened the cabinet door. I got out a wrapped bar of Dial. I started wondering how to do this. Do I unwrap the soap? Wouldn't it get rather tacky? I wasn't sure and since it was late, I just unwrapped a little square of the wrapper so some of the fumes could escape and started back toward the bed.

The hubster said, "What is that?"

 I replied, " It's a bar of soap."

 "Well, I can see that. What are you doing with it?" he retorted.

Now, I knew I was going to meet with resistance on his part. He doesn't believe in folksy cures. So I simply said, "It's supposed to help with leg cramps." That was that. He turned over and went to sleep. No big deal.

But with me, it was an entirely different story. Let me ask, have you ever slept with a brick? Every time I moved, that darn soap was either on my foot or between my ankles. It kept me awake for quite awhile.

 Finally, I drifted off to sleep, only to be awakened by a horrible dream. In the dream it was quite hot, and I kept stubbing my toes over and over again. I awoke with a start. It really WAS hot...the hubby was ready for the "supposed" coming ice storm. I am certain he had the thermostat set at 450 degrees and I was roasting. I leaped (ok, stumbled) out of bed to change from my fuzzy ice storm gown to something more comfortable and when I got back in the bed SOMETHING HIT MY FOOT!! SOMETHING WAS IN THE BED!! This time I really did leap out of the bed...screaming...there was a third thing in the bed ... what was it?!!! I nearly had a panic attack.
Until I was reminded... Oh, uh, the bar of soap. I had completely forgotten about it.

This morning when we began to make up the bed IT was gone. The soap was not there. Where did it go? I have NO idea. (Personally, I think the hubster removed it in the night, but then what do I know?) Maybe the bar rode off into the sunrise, "My work here is done."

But whatever it was, all I know is I didn't have a single leg cramp last night.


May all your nights be leg cramp free,

Tuesday, December 25, 2012

Merry Christmas!

Dear Friends,

Just a note to wish you a wonderful holiday! Christmas in the south was stormy but we all managed to get where we were going and had a great day.

I must admit that I find the actual afternoon and day after Christmas a little depressing...always have...but this year I took measures to divert that oncoming freight train. I began a NEW craft...oh, I know you can't believe that!

One of the gentlemen who helps us find various items for our shop, Dwellings, brought me a whole bag of zippers! They were still in their original wrappers and were metal! So zipper jewelry it is! I've had a fun time and have already made 3 pins...I made them last night for Christmas happies today! I was so distracted that I forgot to be depressed! (Even as a little girl I had this problem...not sure why, but it's a bummer, for sure. And I am ashamed of myself for feeling this way. When I consider all God has done for me and for my family, I know I have NO right.)

I will show you my creations as I get a little more "into" it...I've seen lots of neat things online and even bought a tutorial on Etsy which had great tips. I am going a slightly different direction with my ideas and I will share soon.

I truly hope for all of you that 2013 will be a peaceful, hopeful year. But if it's not, remember, "this too shall pass".
God bless you and the ones you love,

Friday, December 14, 2012

Making a Fun Shred Bow


Do you like to wrap gifts?
 My deep dark secret: I don't.

But this year, I have time and have come up with something fun!
I made all these bows at one sitting and then just tied them on.
I bought nothing. I had everything on hand.

They look cute on everything!
You can change the elements to fit your mood or occasion.
You can have them made up and on hand when you need them.

Before I show you how to do this, a wrapping tip that might make your wrapping chores go a little faster!
First, save your pretty tissue...it may be inexpensive to some people, but if you buy really nice tissue, it is NOT cheap!
As soon as Christmas is over...take each piece and run a hot iron over it. (If it's the heavy waxed tissue, be careful..it may stick, so test first.) But for regular tissue, the iron is your best friend. Turn off "steam".
The pic above is the "before".
This shows how nicely the paper turns out after a few swipes of the iron.
Now, fold the Christmas tissue, put it away to be used next year.
Note: If it's torn, I just toss it.
I am NOT cheap, but I cut costs where I can.
If you will look at the first pic above, you will see a cute little bow that I came up with for my packages.
I was determined not to buy a single wrapping element this year. My "wrapping" box has become
out of control. I have so much paper, ribbon, etc. I decided to wrap everything with only things I had.
Above are the only things you need to make tons of tie on bows.
Curly ribbon (green and red on the spools); paper shred (you need red and white...I only show red);
sparkly red shred (or some other color).
Also note the single silver strand of ribbon. Most important strand of the bunch!
HOW TO's:
1. Cut a piece of ribbon about 12 or 13 inches long that is a different color from all the rest of the elements
 (mine was silver).
This will become the tie for the bow and the way you tie the bow to the package.
*If you use all the same color for this piece, it is too hard to find the "tie on" piece when you are ready to add the bow!
2. Pull some of the long sparkly shred from the package and loop it back and forth until it's a fat little bunch.
Lay it on top of the silver tie piece.
 Make sure it is going the opposite way from the silver.
3. Pull out some paper shreds and pull them so they are longer and no longer bunched up.
Lay them on top of the sparkly red.
4. Make a looped bow using the curly red and green ribbon.
Holding the center of  the looped  red and green bow, carefully lay it on top and then tie the whole thing together with the silver ribbon.
Use the silver ribbon to tie the bow onto the package.
There's tons you could do with this idea.
Add balloons, flowers or other fun elements for birthdays, etc.

Happy Friday!

Sunday, December 9, 2012

Remembrance Potholders

What a week it has been! I've had doctor visit after doctor visit. Let me just say, those visits have finally done it...scared me into being serious about my health. I may go down, but it won't be with a mouthful of Little Debbie's. It's probably just as well Twinkies left the market when they did.

Also, I've decided I am a procrastinator of the worst kind! I've known about the following project since May, and even though I still have a week left before they are due, I am just now finishing them...bad, bad girl!

My mother was one of those kind of cooks that could look in the pantry and in 30 minutes have a great meal on the table. Me? NOT so...everything she cooked was delicious and in her honor, I decided to make pot holder keepsakes for our family for Christmas this year.

Since only two or three members of the family read my blog, I won't be giving away the surprise to many! And a word of caution!!! This is a time consuming project...not expensive, but it IS a labor of love. So if any family members are reading this and I know who you are :) , when you open yours at our family Christmas, you can really make a big deal of it...haha...just kidding...I think.

I originally saw this idea in Country Living magazine and then saw where a lady would do this for you for $38. What?! Yes, Virginia, it's worth it.

The first thing you must do is select a recipe in your chosen person's handwriting and copy it so that you have at least three copies on a sheet of copy paper. This is if you want to make more than one.
You will eventually be making a copy of that recipe onto cloth
and then attaching the cloth recipe to a potholder.
The potholder prototype was green, but the ones I did for family were black.
They match a monogrammed dishtowel I also made for said family.
Step One: Gather your materials.
 Buy your potholders. Also buy smooth material on which to print your chosen recipe.
I used khaki broadcloth.
The other materials are:  fusible Pellon or WonderUnder, an iron, a printer, and a sewing machine.
Some cute ribbon and a button are optional.
Step Two: cut two pieces of fusible web as wide as regular printer paper and about 1 inch high.
Step Three: Press your broadcloth so it has no wrinkles..at all.
Then sandwich the fusible web strips between the cloth and the computer paper at the top and bottom.
Press lightly until the paper is bonded to the cloth and it all lies flat.
Cut out the cloth using the paper as your pattern.
This is the paper and cloth after bonding but before being cutting out.
Step Four: This is how my printer accepts paper, so I carefully slipped the paper with the cloth attached into the printer and copied the recipes onto the cloth.
I was able to get three of my mother's recipes for Poppy seed Chicken onto the paper sized cloth.
Now, this is dicey. Once I used double sided tape rather than the fusible web and it didn't work so well,
 thus, the fusible web.
However,  REMEMBER this:
When placing your recipes to be printed on the original paper, Skip down about an inch on the page to print...thus you will avoid having the bonded part of the paper stick to the back of the recipe.
Step Five: Cut out the cloth recipe. Try to do this smoothly and clip all little threads as you go.
Attach the cloth recipe to the potholder by cutting a piece of fusible web the size of the recipe and
 ironing the recipe to the front of the potholder.
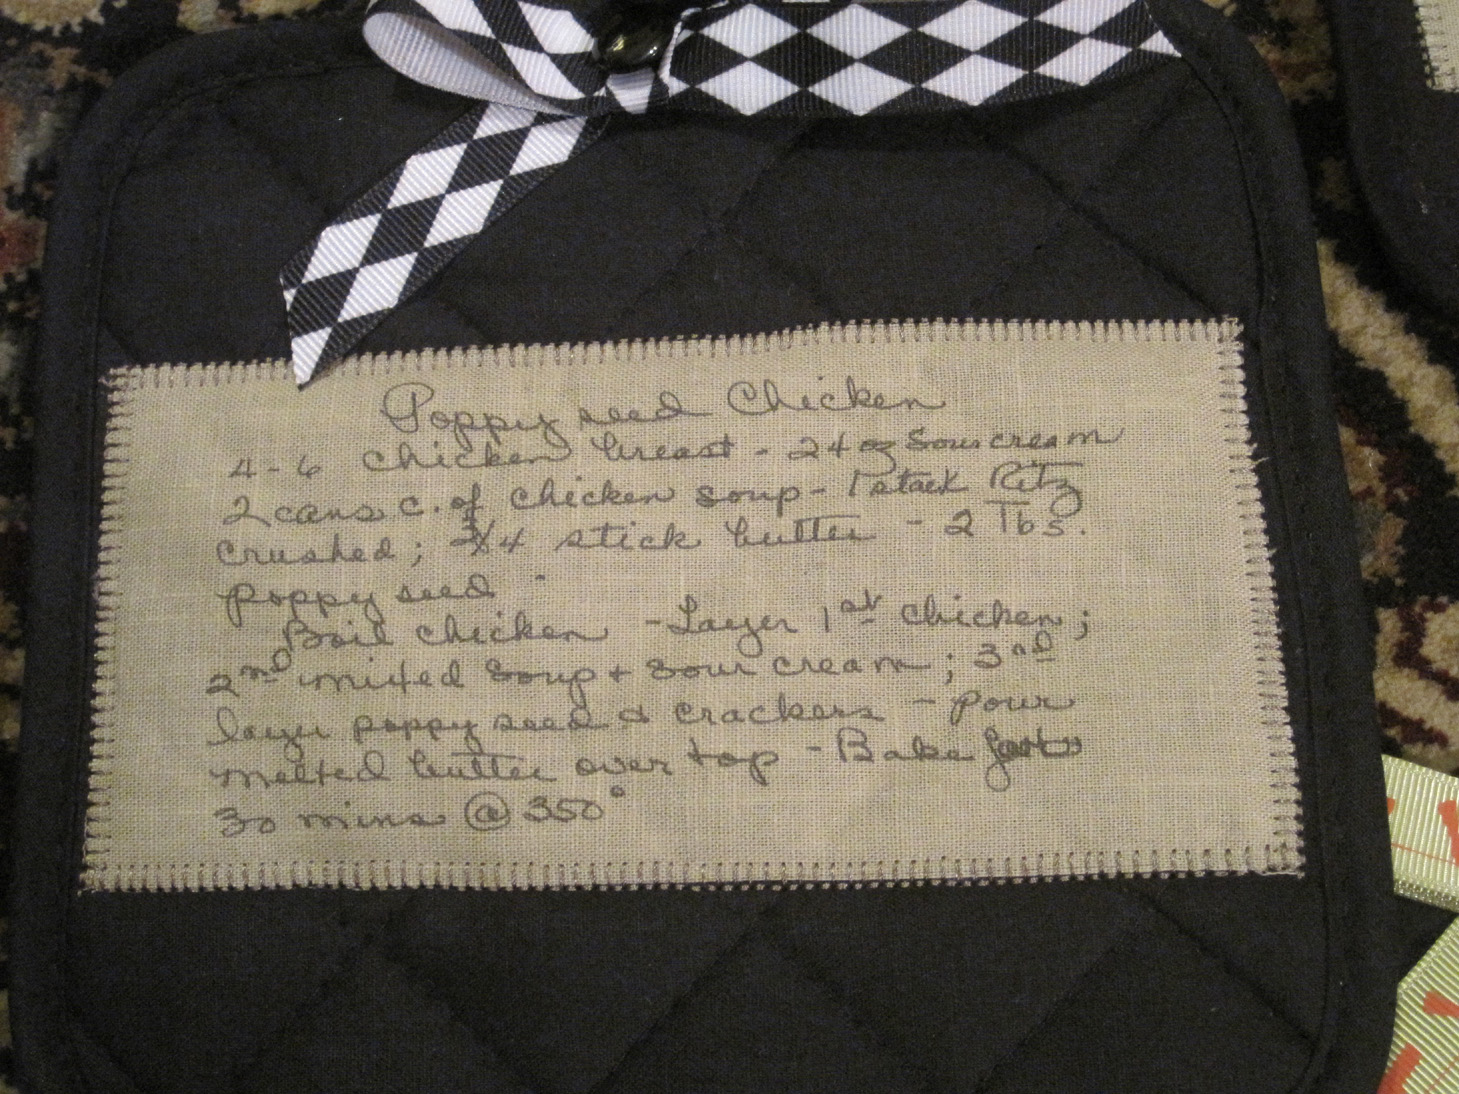
As you can see, the resulting copied recipe is clear and looks very good!
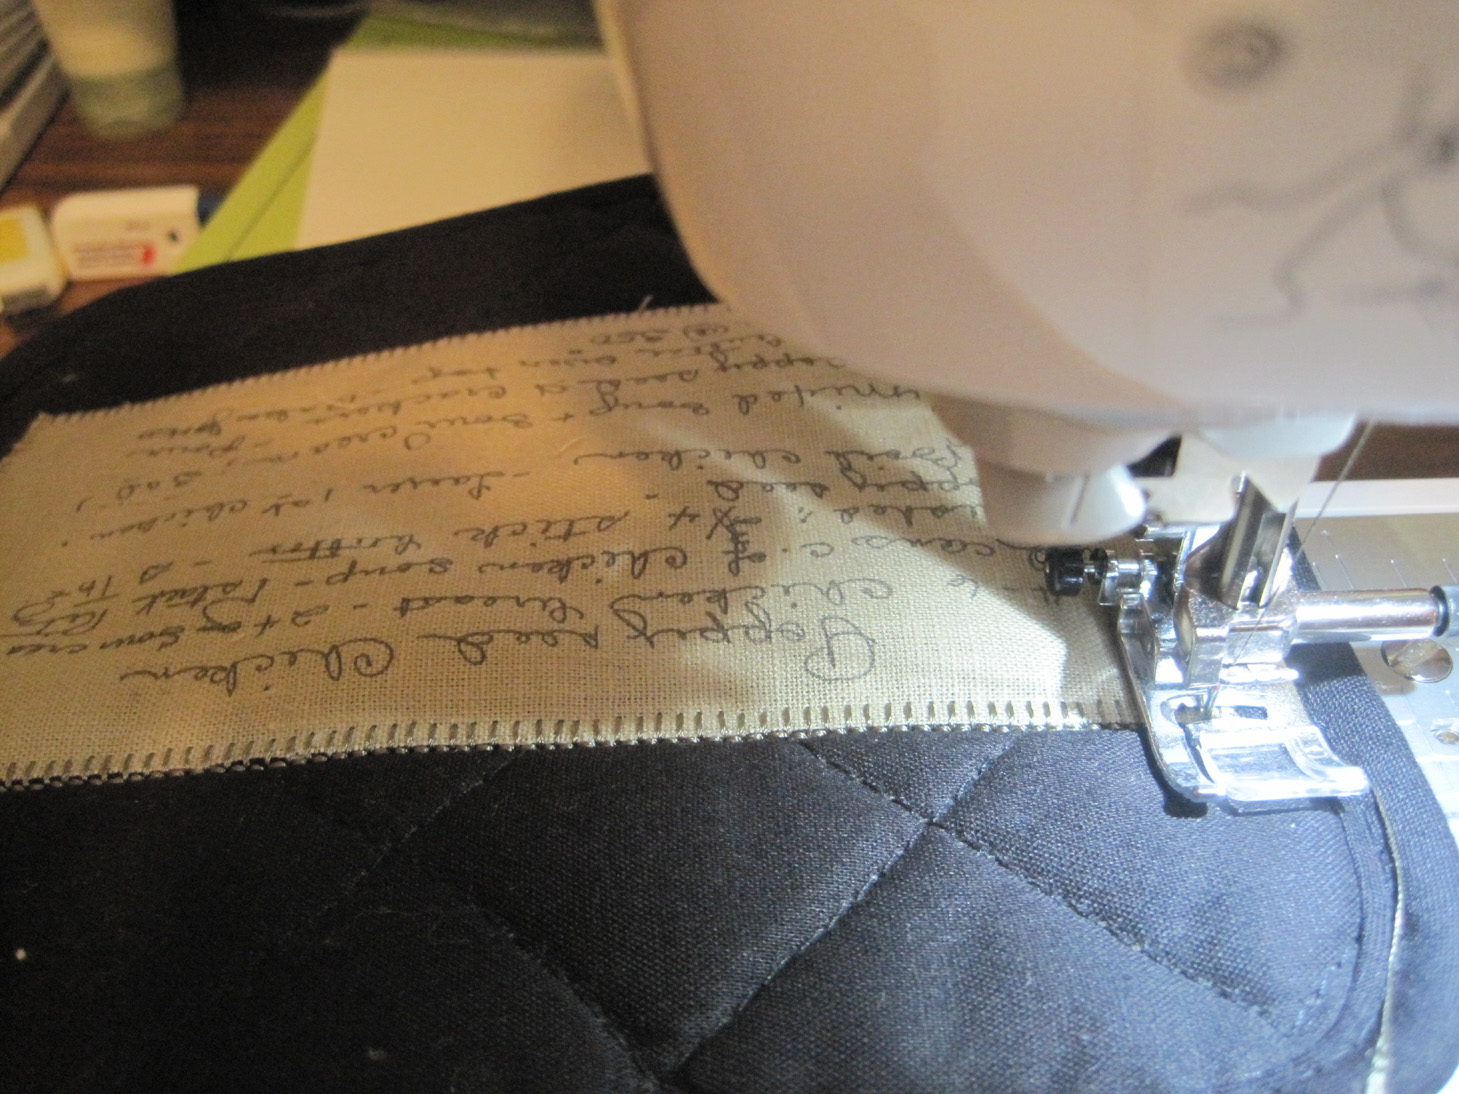
Step 6: With my Brother SE 400 machine, I finished the edges of the cloth recipe with an overcast stitch.
This could be done by hand or a little ribbon trim or rickrack could be ironed on around the recipe.
Step 7: I added a bow and a button at the top.
The bow color matches the monogrammed initial on the monogrammed dish towels.

I have no idea if the potholders will hold up to washing,
but these aren't for everyday use.
These are a remembrance of my mother and her skills in the kitchen
and the love with which she prepared our food for so many years.