Monday, November 17, 2014

Over the River and Through the Woods....


Thanksgiving's on its way!! I have always had the most difficult time making dressing (southern for "stuffing".) Once we threw it out to the birds and they flew away...so when I found this recipe for Crock Pot Chicken and Dressing, I thought, "Why not?" I am SO glad I tried it...it's not the usual throw everything into the slow cooker and walk away. The prep time is longer, but it's worth it...this is THE BEST DRESSING ever! I found this recipe here:  http://www.mommyskitchen.net/2012/10/crock-pot-chicken-dressing-happy.html
I must say, her blog on this was much prettier than mine! I am still getting used to Windows 8 and a new laptop. Either way, you will enjoy this recipe. I promise.

Read recipe all the way through before attempting. Here are the ingredients and instructions.

                             Bake 3 boneless skinless chicken breasts for about  40-45 minutes
                                                                     @ 375 degrees.
                                     (The recipe called for 5 but my family doesn't like that
                                                                     much chicken.)
                                                     Reserve broth from baked chicken.

Chop 2 stalks celery and 1 small onion
 (This is to be added to cornbread mixture below)

1-2 t. sage, 1 t. salt, 1-2 t. poultry seasoning,
and 1 t. pepper.
Add to cornbread mixture below.

Make two cornbreads from 2 packages of mix or use your own recipe.
 I used corn BREAD mix...NOT muffin mix!
(Muffin mix is sweet.)
Toast a hamburger bun or two pieces of bread.

Crumble and combine cornbread and 1 toasted hamburger bun
or 2 pieces of toasted bread.
Add spices.
 

Boil two eggs, peel and chop. Add to cornbread mix.

At this point, add one can of Cream of Chicken soup,
two cans of chicken broth and any chicken broth from the cooked
chicken breasts to the cornbread/bread mixture.
I used my Kitchenaid mixer to gently combine the mixture.
 

Melt one stick of butter.

Shred chicken breasts and get ready to add to cornbread mixture.
Add shredded chicken and melted butter to cornbread mixture.

Tip: I shred my chicken while it's warm with the mixer.
Add shredded chicken (after the butter) to the cornbread
mixture.

Tip: Melt butter in small bowl in microwave.

Tip: I have discovered Reynolds Slow Cooker liners!!
Greatest invention EVER! Add liner to Crock Pot.

Set on high for 4 hours.
Add 1/2 can of second can of Cream of Mushroom soup to bottom of liner.
Spread around the bottom.
Add all mixed ingredients to Crock Pot
 and  add the other 1/2 of the soup to the top.
The original recipe called for layering.
I did NOT do this, but feel free to.
I like the chicken throughout the dressing.

Tip: I keep a colander in the sink and put all egg shells,
cans, paper, etc. in it. At the end of the process,
I just toss everything into the trash can.

At the end of three and a half hours, check the dressing.
Mine began to cook too much around the edges.
After all, the ingredients were all cooked before they
went into the pot.

I must say, THIS IS THE BEST DRESSING I HAVE EVER EATEN!!
The dressing was moist, the chicken was tender and it was seasoned
just right!! My only question is, could we leave out the chicken
and just have plain dressing? I think so!!
PLUS: My husband LOVED it!!
After 36 years of trying, I did it!!

Let me know what you think!

Angela


Sunday, June 8, 2014

Hello and happy summer (almost)!
So much has been going on here.
My husband has retired after 42 years of work
and we are adjusting to that.
So many tasks to do that have been set aside until
"One Day"...
One day has finally arrived!


My June 2014 Better Homes and Gardens
magazine arrived last week.
I was so busy that I tossed it into the
"One Day" pile and forgot about it
until today.
On a quick drive out of town to see #1 Little Sister
and family today, I grabbed the mag to read.
May I say that it was the best issue I have read in a great while.
So many beautiful pages...
filled with all sorts of sensible, affordable information.
I have changed my opinion...I used to think of
BH G's as a "granny" magazine...
not any more!

This month was the announcement of the BHG Blogger Award Winners!
They awarded two awards for each category...one was for Readers' Choice
and the other was for Editors' Choice.
I couldn't wait to go through and visit the sites.
Here were a few of my favorites.
(I am a very, very minor league blogger...these gals are Major Leaguers!)
Visit them when you can...you won't be disappointed.
 I really loved some of the colors and furniture choices in this blog.
Good before and after shots.
 This blog's author is funny and while some of her DIY projects are
a little more modern than my traditional tastes, many of you
will love them.
 Anything with the word Nest in it catches my eye.
Great eclectic projects. You will want to browse all night.
Wish I had seen this blog a long while ago. If you like to entertain,
this one is for you!
Try these out and let me know what you think.
Get a copy of the June BH&G!
 
Blessings,


Tuesday, May 6, 2014

A Look At Home


This week, two incidents have given me pause to examine some feelings. First, I have reconnected with some old friends from Grenada over the past few months and have enjoyed exchanging pictures of days gone by with them. Second, I received a decorating book that I ordered with the recommendation of another blogger. I knew I was wrong when I ordered the darn thing...too many pages were filled with things I could never have. I once had a pastor who said he threw away all the catalogs that came to his house. That they just set in motion a yearning for more and more things. How true.

As I mentally put the book aside, (still in my pajamas) I grabbed my camera and out the door I went.
I quietly absorbed the country stillness, the birds at the feeder, the gentleness of the breeze. I photographed "our land" from different angles.

This photo is the road "home". Every time I turn onto it, I feel a peace come over me. It's not grand...just a country road, but it signals that I can leave turmoil behind, if only for a while.
 

When I sit on my back porch, these pastures are my breathing space. Nothing fancy, just a few horses and some donkeys, a few rolling hills. But when I hear the hooves beat, and see them gallop toward their feeding area at dusk, it just can't be beat.
 
I enjoy sitting on my back porch when it rains and watching my rain chain flow.
 
 My birds that come to my feeders never disappoint me.
 
...and those that choose to nest with us every year are like loyal friends.
My friends are a lot like my favorite birds...there's the chickadee who always flits around, is friendly, kind,  shares with others and ALWAYS gives me birdseed as one of my Christmas presents! There are two cardinal friends. They are loyal, always present, and bring beauty and calm whenever they are around. Then there's my mockingbird. She is not afraid to tell me the unvarnished truth...she frequently states, "Stop the Madness!" and pulls me back when I overdo (..she also eats Mexican with me because my husband won't!) Now that's true friendship. My bluebird friend and I can be away from each other for many weeks, but when we get together, we pick right back up where we left off.
 
Below is my feeble attempt at gardening. I bought the tomato plant that was the largest and already had a tomato on it....lol.  My flowers really show off sometime and wither hideously other times. But I don't give up...every year I make space for some sunny little faces that give me immense pleasure when they decide to cooperate!


My point in this diatribe is that I really cherish my family, friends (both old and new)  and surroundings. I am satisfied..(if I had a workroom and a dining room, I'd be 100% satisfied). I don't love "things" like I used to. Instead, I love people and places that give me fond memories. I would rather somebody else be pleased or delighted than experience those feelings myself. No, I am trying to send out a "humble pie" vibe. It's just the plain truth.

I don't have to have a showroom house, inside or out. I used to think I did but not anymore. I consciously choose a home with integrity...furnishings with comfort...objects that have sweet memories and people with character and loyalty over showroom any day!

Blessings to each of you,

Angela


Sunday, April 20, 2014

A Renewal of Hope

After living in the hot, humid South for over six decades, I have decided my preference (in order) for the four  seasons:
#4...SUMMER (too hot, too much daylight, too much humidity, and did I mention, Too HOT?)

#3...WINTER (I used to LOVE winter until my joints made it perfectly clear that they did NOT.
However, I do love the starkness of the landscape and the flash of red as the Cardinals feed at the bird feeders. We even had snow this year, which made for a gorgeous Spring. And fires in the fireplace....nothing better!)


#2...SPRING (I will discuss below.)

#1...AUTUMN (The colors make my heart pound! As some of you know, I have NO favorite color..
I love them all. That's why it's so hard to make decorating choices for me...I am pretty easy to please..at least for a while.)


Why has Spring displaced Winter as #2 on my "Ordered Favorite Season " you ask?
I always "liked" her...but she was like the "boy next door"...I never really and truly saw her. She was always there, quiet and delicate, but she didn't knock my socks off. Once I noticed, I fell in love.

There's something particularly endearing about the fragility of Spring. Those first few weeks when that lovely light green fluff begins to emerge from the cold, wet earth. The one little sprout, then another and then a glorious bud. The sunlight filtering through the newly budded leaves on the trees is something to behold. Spring is the season of hope renewed.


No words can adequately describe the beauty of God's creation. He provided just what we fickle humans needed...He knew that we couldn't stand the color riot of Autumn year 'round. Why we'd certainly begin to ignore all that flashy color. He was keenly aware that we would be depressed and lifeless if all our days were spent in the cold. Short on daylight we would be short on thanksgiving. Summer, the eternal vacation days of youth, would only be wasted on the young.

Now, Spring is vying for first place with Autumn in my heart. After losing both my parents, I have come to the realization that my seasons here on earth are also numbered. That reality is slowly sinking in. Oh, I've heard the new "mantra"... 50 is the new 30. So 60 must be the new 40. The problem with that way of thinking is that it gives the illusion that we will never age. We will be forever young in mind and body. And that's just not true. You can Botox and Lifestyle Lift  all day long, but the reality is every day that passes pushes you closer to your eternal destiny.

How sad that it has taken me this long to learn life's lesson. We aren't guaranteed another "season". We must seize the day. What a life we would live if we used our allotted minutes to do that which we were placed here to do! Each of us has a particular purpose given to us by the Creator. How wonderful it would be if we didn't rail against our "lot" in life and if we just determined that purpose and set our eyes on "the prize" and pushed forward toward accomplishing His desire for us.

Jesus did that. That is what Easter is all about.

 Jesus accomplished the purpose set forth by the Father.
He came as a man, He lived, died and rose again. He did His Father's will. And He did it for us. Without His determination to do His Father's will, we would have no hope...no promise of Spring.
Think on these things...time's a'tickin'.

Blessings on this Easter day,

Monday, April 7, 2014

How To Weave A Fabric Chair Seat

Welcome to my fabric chair seat weaving post!
About a year ago, I decided that I had too many ladder back chairs
in my shop, Dwellings.
Most needed work and because I have an affinity for old chairs,
they kept multiplying.
 
One day I decided to try my hand at weaving a seat, but I began with
a small stool.
 Before: Poor thing
After: My first attempt
It wasn't great, but when one of our favorite customers purchased it, that inspired me, and I began the journey of fabric weaving not having a clue what I was doing!
 
 Things didn't get much better.
 I couldn't decide whether to paint the chairs or leave them chippy.
So I did a little of each.
I was weaving like we used to weave pot holders. I was not weaving both top and bottom and I knew there had to be a way to make the weaving prettier. I began to search the Internet and found one short blog entry that gave some tips.
Now I weave top and bottom and have reduced my weaving time from 4 hours to about 2 1/2 hours.
I do sell these chairs in my shop and I will give you a break down on costs.
It costs more to do these than it would first appear.
In the two pictures above, I used fabric I had on hand, but it
is much more fun to color coordinate pretty fabrics.
Please, read all the way through before beginning.
Let's get started!
 
1. Chairs ($10)
 
Chairs need to have the seat removed. They must have rounded dowels on four sides to do what I do.
Dowels need to be in place and sturdy. I use old metal tin snips to remove the seat. I repair or glue and clamp any areas that need it at this point. I have a rule...I do NOT pay over $10 for a chair.
 
 This chair above is in the seat removal process.
You will be amazed at how dirty this process is. Be prepared.
 

(Apology: new computer..can't figure out all the rotate features. lol)
This chair is ready for weaving...it was painted with Annie Sloan Old White.
NOTICE: The back and front dowels are lower than the side ones.
This is important to notice. More in a minute about this.
 
2. Paint ($5-8)
I would rather take a beating than paint a chair! So I don't take lightly the decision to hand paint or spray. If I spray I use Rust-Oleum Ultra Cover 2X Coverage...it's about $3.76 per can and I use a can and a half per chair. (About $8 for spray and about $5-6 for hand painting.) I DO love all the pretty new colors you can get today and most of my chairs are bright and inviting. People LOVE turquoise, red and hot pink. I personally LOVE black.
 
As you can see,  I have improved my technique since those first attempts!
Love these colors and fabrics.
 

 I love this small chair. I didn't paint it.
It was painted brown and I left it alone.
 

This was my grandmother's maple ladder back.
I love the way it turned out! I used one fabric.
 
3. Fabric ($10-20 per seat)
Ahhh...fabric. Did I mention that I LOVE fabric in addition to chairs...and china...and Majolica...never mind. Fabric color and type is your choice. Let me give you some pointers that I have found helpful. First, once the fabric is woven, the pattern pretty much goes away. The colors remain, but the cute chicken on the fabric is gone. Remember this when selecting fabric. Go for color and smaller patterns. 100% cotton quilting fabric is nice but pricey...$9.99 yd. If you get it 40% off it's not so high. Cotton and poly blend is OK, too. Burlap, canvas, denim...not so much. They are hard to handle but it can be done. (Just hope you don't mind the ruined manicure and a few blisters.) If you want to wash your fabric, go ahead. Your choice also.
How much to buy? I will explain why below, but let's say 3 1/2 to 4 1/2 yards of 45" wide fabric per chair.  
 
4. Fabric prep
I take a color sample (spray can top) with me to the fabric store.

Excuse the sack...I was so excited about my paint, I forgot to move it.
 

 Depending on the design, you will pick one, two or more fabrics for your seat.
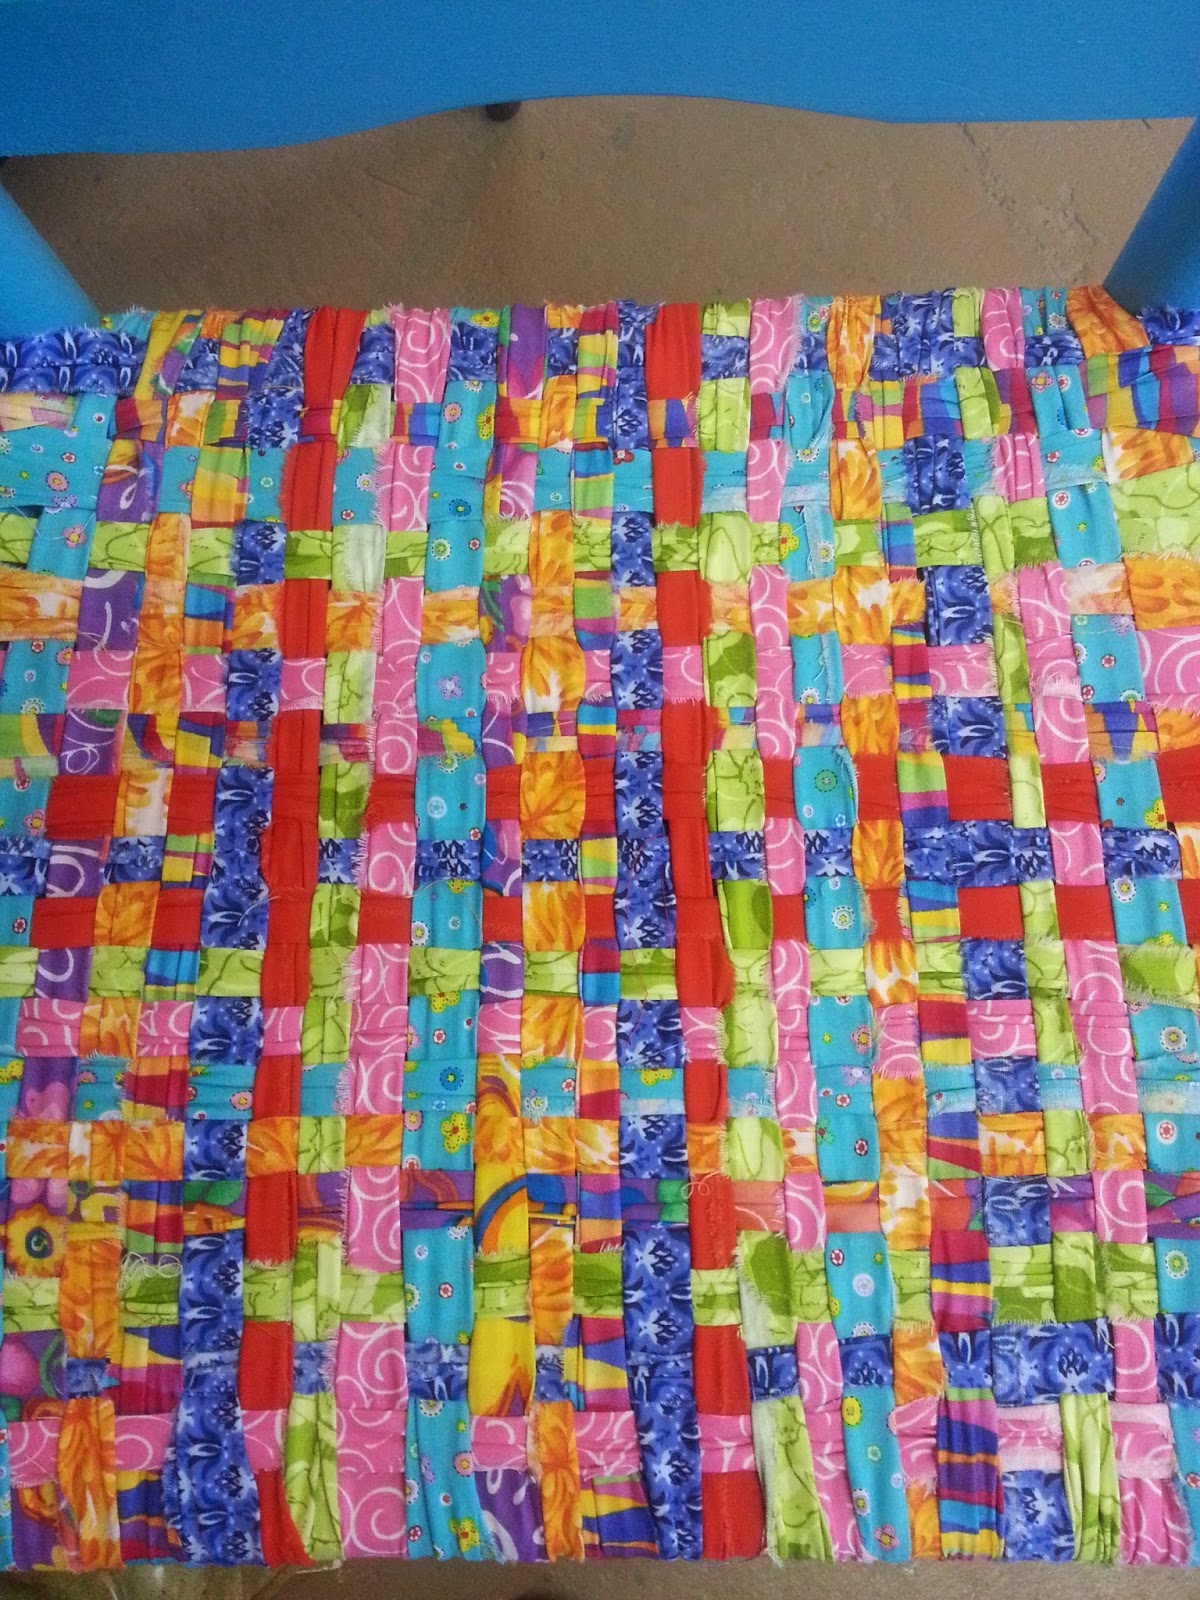
 This seat uses several colors...but a purposed repeat.
Strips are folded and scrunched.
 
One fabric...random weaving.


Two fabrics...checkerboard effect.
Strips are not folded but are scrunched.
Some fraying shows.
 
The world is your oyster. Do whatever you like!
How to prepare the fabric for weaving is my own little way. You do it as you wish. Some people like to fold their strips. Some iron them (ugh) and some sew the strips. Me? I scrunch mine. So these directions are for scrunching.
 

Pick out your 45" wide fabric. Approximately 20-23 strips will be needed horizontally and 20-23 strips will be needed vertically. If I have 5 fabrics, and I am using (23+23=) 46 strips divided by
5 fabrics=approx. 9 strips of each color.
 
 Keep strips separate or you will have one big mess.
 
Some people cut their fabric. I tear. Make the number of cuts you will need on the selvage (woven) edge. I make mine about 1 1/2 " each. Then tear. You will be tearing horizontally and your strips will be more even than if you cut. You will have to deal with strings...but oh, well. Your first tear will not be even because you are having to make up for the people in the fabric store who CUT your fabric unevenly. This is where good fabric is important. Knit, canvas, denim and the like are not suited to tear, you would have to cut them. Burlap....I won't even go there, but it would look cute.
Notice the frays on the edges. I like that. You, on the other hand, may not.
You have got to commit to folding, ironing or scrunching.
 
Now, working from front to back or side to side...your choice..(I use the lower dowels first, but remember, I am self-taught, so I don't really know what I am doing!)
Tauntly tie one of your strips in a double knot around two dowels. Trim the knot tails to 1'.  Then rotate that knot to the underneath side. Have the knot somewhere in the middle not too far forward or backward. You will tuck those knots in to hide as you progress.
As you continue tying, "scrunch" the strips together. Be
careful that you do not cover one strip with another..just scrunch enough to make room for the next one. This will make your strips into a tight weave.

I used 23 strips here. What if I used 24? I could have used 30...it's your choice!!
Knots are underneath. They will be hidden.
Be prepared for the next pic....haha.
I destroyed this evidence of my incompetence awhile back.
My first attempt at weaving...and not hiding knots!!
Yes, only special people get to see this hot mess.
 
Moving along...
Once all the strips going one way are tied and double knotted and rotated to the underneath side, it will be time to weave in the opposite direction.
Begin your first strip in the middle and only pick up the top half of the strip and weave over and under.
As you weave, scrunch one strip into the other to tighten.
This isn't scrunched enough...the strips need to be more even..
keep fooling with it until it looks neatly done.

There will be approximately 8 inch tails left on both sides after you weave the top.
Holding on to both tails...pull to make the fabric taunt. Flip the chair over and on the underneath side begin weaving. Weave both tails (one at a time) until they meet in the middle. Tie and double knot. Cut the tail to about 1inch. Hide the knot in between strips. (Easier said than done!) Some knots will show but at least hide the 1" tails.
Above is the underneath side of a finished chair.
Knots are pretty much hidden.
I use a little dab of Elmer's Glue All
or fabric glue could be used to make sure the knots are secure.
That's pretty much it!
Here are a few more pictures that might give you some ideas.

Child's rocking chair
 I can't remember how I did the gray one.
Red is a great color!
Doll Chairs and doll bed above..


Photography props!
 
 
Whatever you choose to do with this info is up to you.
You might be like the lady who came back and handed me
$50 and said, "Never mind, it was too hard. I will just buy one!"
 
We invite you to LIKE our Facebook page, Dwellings.
Our profile pic is an orange Pyrex bowl.
Our physical address is 3955 highway 49 south in Florence, Mississippi
Our hours: Wednesday-Saturday 10-5
 
I also invite you to FOLLOW my blog:
 
Blessings,
Angela McInnis